Posts

Tuesday, October 11, 2011

Sooo I haven't posted in a while

This blog was originally for myself as a way to keep track of my jewelry making
and to have some sort of progress chart but that did not really work out too well.
I think the fact that I don't have anyone following my posts I have no motivation to keep posting.

Sad I know!!


I think I will motivate myself by broadening the purpose of this blog from just crafts to fashion and food as well since those are my main interests.


As soon as I get a new battery charger for my camera I will be a lot more involved in this,
but for now I will settle for some older pictures

Blue and white stripped blouse with a pink and black leopard print dress, a vintage beaded necklace and black tights


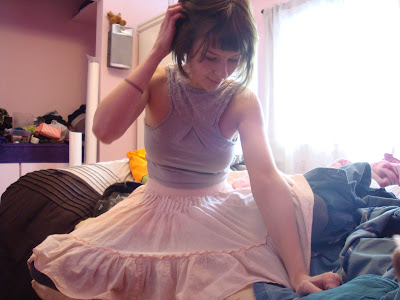
knee length pink skirt with a grey vest worn backwards and tied in the back


Mini blue button up vest with a high waist blue and green and purple swirly funky skirt that I LOVE.LOVE.LOVE!


Vintage black I'm-not-quite-sure-what but it's gorgeous, long, dainty and surprisingly heavy with a high waist skirt and bandeau


White shear shirt, simple black skirt, vintage belt, blue corduroy jacket and flower tights


One of my favorite fun outfits back when all my hair was chopped super short (I admit that I miss it) gray leopard tights, a fluo green/yellow shirt worn as a skirt with a cute shirt with water creatures in bubbles!


Saturday, April 9, 2011

Tutorial: Basics on making paper beads

Yay! I've finally finished prepping, taking pictures, and put it all together and therefore can post my tutorial now!
I will show you the basics of making 5 of my favorite bead shapes.
The first is my generic oval(ish) shape, i've already posted pictures of these - the blue ones, and how they look on a bracelet. So here we go!

Step 1) Measure out and draw lines on piece of paper (I used newspaper)

'
From left to right, 1/2" bottom x3, 1", 1/2", 3/4"
On the top I measured 1/8" from the side (will be discarded), the smallest ones are 1/4"
then 1" and 1/2"

Step 2) Cut it all out! So just follow the lines, and cut out the strips, it'll basically look like this

They are all mixed up here..didn't think of putting them
in order really!

Now that everything is cut out and prepped you need to get some glue, and something long and thin, I use those plastic coffee stirrers that I cut in half down the middle.

TO ASSEMBLE!
Starting with my generic "oval" shape
Take one of the pieces that have a 1/2" base and 1/4" top (seen on the left of first picture)
So you have to put glue on it, but start from about an inch from the end so that it doesn't stick to the coffee stirrer.

See? Glue about one inch from the end!

Then you have to roll the un-glued end on the coffee stirrer

I find to get the tightest roll, it's easiest to leave a bit of an overhang

And then you roll it up! Make sure it's tight and doesn't slide around
it'll make the rest of the process a lot easier

At this point you can just roll it all the way to the end of the piece of paper and make sure to secure it with glue

If you keep it pretty straight, it will look like this, make sure to glue the end down
don't worry about making it perfect!
Once you get to the end of that first one, you start with the second piece with a base of 1/4" and that ends in a point, roll that up and you'll be done!

Rolling the second piece

Done!

So the technique is always the same no matter the shape but I will give some more examples just to PROVE to you that I'm not lying!

So this is probably the easiest one to make, it's just 1/2" on each end
and rolled straight..simple, done!

This is a cone one (made from the right angle triangle strip of paper)
It's a subtle cone but if you made the triangle longer it will be more defined

This is probably one of my favorites because it's just SUPER funky
It's made with the piece of paper that has the two pointy peaks

Might as well show a picture! This is the one that makes the bead that looks like
one of those sand timer things...can't think of the real name!

The last step for all of the beads is to VARNISH!!!!

I use mod podge, the glossy one and just lather it on each bead, this is why it's good to have the beads on those coffee stirrers. You can leave them on, put some mod podge and let it sit on a bowl or dish so that the beads do not touch anything.
I usually put two coats of mod podge and one coat of nail lacquer.
I feel like at this point they are hard enough to use. Although with any bead that is thinner, I suggest an extra layer of each!

Tad um!

*Any other varnish can be used if you don't have the ones I mentioned

Oh and another *
**If you leave the side of the paper with the pen lines you will see the lines in the finished bead ( see my other post on blue newspaper beads. The ones that I made in this post have the lines on the bottom side so you don't see them that much.

I think that's it!
Enjoy experimenting with paper beads!
Buh byeee!

Wednesday, April 6, 2011

Tutorial on paper beads

So a classmate of mine is going to Uganda in the summer and was curious about how I make my paper beads and would like to learn how. Apparently they make paper beads there and when she goes she would like to make paper bead bracelets and necklaces with them and needs my help to be prepared so she doesn't look like a n00b (aka have no idea what to do)!
So I thought it would definitely be a good time to take some pictures while I show her how to make some stuff and post it on here as a tutorial so you guys (who ever you are...if you exist) can follow along and maybe learn something as well!!
So paper bead tutorial to follow!!!

Oh and i've blamed my loss of productivity and motivation on all the over whelming ideas I have swimming around in my head so I decided to write everything down, put each idea separately in a hat or bucket or something and then pick something new as a challenge for each week (ideally).

So lots of new and fun stuff, hopefully with lots of pictures if I remember and more tutorials to come!!!

Thursday, March 31, 2011

Recycled paper beads

So I've been making paper beads for a little while now and it is honestly SO easy and SO fun.
There are so many different shapes that you can make with them
and I've been just winging it so far and seeing what a certain shape, length, color will turn out looking like.
The hardest to perfect is probably a "perfect" circle.
I'm almost there, but not quite.

My basic bead that I make is with a base of 1/2" and about 24" long
this gives me more of an oval shape (which I really love)
Blue newspaper oval beads
I also make the more long and slender beads as well that I use to make a specif bracelet type
Long scrapbooking paper bead bracelet
I don't have any pictures of it yet, but I'm also loving really tiny tiny itty bitty beads!
It kind of happened by accident when I had a small bit of paper left over, like 1/8"-at-the-base-tiny and was just rolling it out of reflex when I was thinking of inspiration for something new to do and then I looked at it and it was probably the cutest thing ever!
Well anything is cuter when it's small!!

Oh, and the best part about making paper beads...
surprising people with how versatile and interesting paper can be!!
I always take the train, twice a day, for half an hour each way so I often bring my little set up
of glue, coffee stirrers, paper, and scissors with me and get some crafting done on the road.
People around me are always curious and every once in a while i'll get someone brave enough to ask what it is. When I tell them they just get more interested!
I loveloveloveeee sharing ideas with people!

Hmmm, so I guess that's it for now, I'll try and upload a picture of my super duper tiny beads later...when i'm not so lazy.

Goodbye for now, world!

Monday, March 28, 2011

Going back to recycled materials

So I love working with clay, it's really awesome and fun to use since you can practically make it into anything with all colors and it's really versatile.
I'm really sick and tired of it though!
I worked super hard on all my small detailed clay pieces to sell at Fashion Garden
(which I sold 3 of)
And I am really happy with how it turned out, but all I want right now is to grab some pretty paper and make some beads and maybe try out quilling?

Yup, quilling is my new inspiration and I really REALLY want to get into and be amazing.
Like how cool is this stuff?
I love the fact that you can make something out of little shapes and things and different colors and end up with this really amazing finished product.
It is definitely my new project...I may put it off for a while though since I'm convinced i'll fail :P
haha
so anyways, let me share with you some pictures of my clay earrings and necklaces I made.
(Mostly a reminder to myself that I kinda rock sometimes)

My cupcake earrings, Sold the second and last pair!
My favorite pair of mushroom earrings!

Still very cute mushroom earrings!
Probably my least favorite pair of mushroom earrings
but they are the smallest and therefore they are forgiven for being not so cute
Amazing (if I do say so myself) pair of earrings based off of
Alice In Wonderland
Really adorable tea pot earrings,
proud to say these were my first clay attempts and turned out great!

So, I think that's the end of me being completely obsessed with my little mini clay masterpieces (term used very lightly) and now I can move onto another project!

Have I mentioned I'm a freak about being really organised? And this often gets in my way of doing stuff? Cause everything has to be thoroughly finished and organized and presented before I can move on?
Oh, I didn't? Well now I have!

Don't judge my crazyness too much!

The end!

Saturday, March 26, 2011

Outcome of first kiosk!

So last night was Fashion Garden where I went and set up my first ever jewelry kiosk!
It was really exciting!
I felt like such an amateur though since another girl had a jewelry kiosk as well and hers looked all fancy and perfect!
Oh well, I am still proud of what little I had and even more proud that I even sold some stuff!!!
Yes, it was only 3 things, but it's better than nothing!
And I got a request for a custom piece.
Not bad for a first try.


Here's me at my sad looking kiosk. hehe

Compared to the other girls fancy kiosk!

If nothing else, it was definitely a wonderful learning experience!!!!
I am very glad it's over though so I can take my time and work on some other things.

Wednesday, March 23, 2011

The Results!!

So yes, my experiment with imprinting pictures on clay worked out and I've finally decided to stop being so lazy and to take pictures and upload them!
Enjoy!
Queen of Hearts and Alice with Flamingo mallet earrings

Drink me earrrings

Hanging fish earrings

Tea party pendant for necklace

Alice with flamingo mallet pendant for necklace


Tweedle Dee and Tweedle Dum pendant for necklace

Caterpillar pendant for necklace

Tuesday, March 22, 2011

Solution?

So I've been super duper busy with going back to school and trying to finish up
as much jewelry as possible by the end of the week
(Thursday = presentation of my jewelry to my grade 4 class since they are doing a unit on the environment and Friday = Fashion Garden clothing launch where I will be selling my stuff for the first time! How exciting!)
so I haven't really attempted to fix my problem with transferring images to clay.
In my head I have it all worked out, it's just a matter of doing it and trying!
This time I will definitely do a test run!

Updates on clay disaster #1 to come!! haha

On a happier note, I'm so inspired by everything lately and just want to absorb and learn as much as possible.
New goal = learn as many skills as possible and have fun with it!!

Sunday, March 20, 2011

Big let down :(

So last night I started slaving away to try out this cool idea of imprinting pictures onto clay and baking.
It would have looked SOOOOOO good if it would have WORKED. But it didn't and now I'm sad.

Now I'm basically on an adventure to figure out why it didn't work and how I can make it work.
Good luck to me!

...
Nope, no good luck for me at all.

So I simply followed instructions in a book that I have on polymer clay that I got a while back.
It said to take the photocopied images and put them on the clay, bake, tada!
Well when I did that nothing happened.
So after my research I found out the photocopied image has to be made with TONER or LASER and not liquid ink. So there goes that.
Now I have a bunch of pieces of cooked clay and nothing to do with them.

I'll try to think of an ingenious solution, but it's not looking good right now!

Saturday, March 19, 2011

Welcome to my blog!!!!

So I decided that it was about time that I start a blog.
Well I have one already that I started with my sister but it was a complete flop :(

What is different this time?!

I don't really care if no one looks at my blog, it's more for myself. You know, to stay organized and keep track of all my stuff!
(But at the same time I will not be unhappy if you decide you love me and my crafts and want to follow along!)

Soo, stay tuned, or not, for upcoming craftyness!!